 |
| Arduino Sorular |
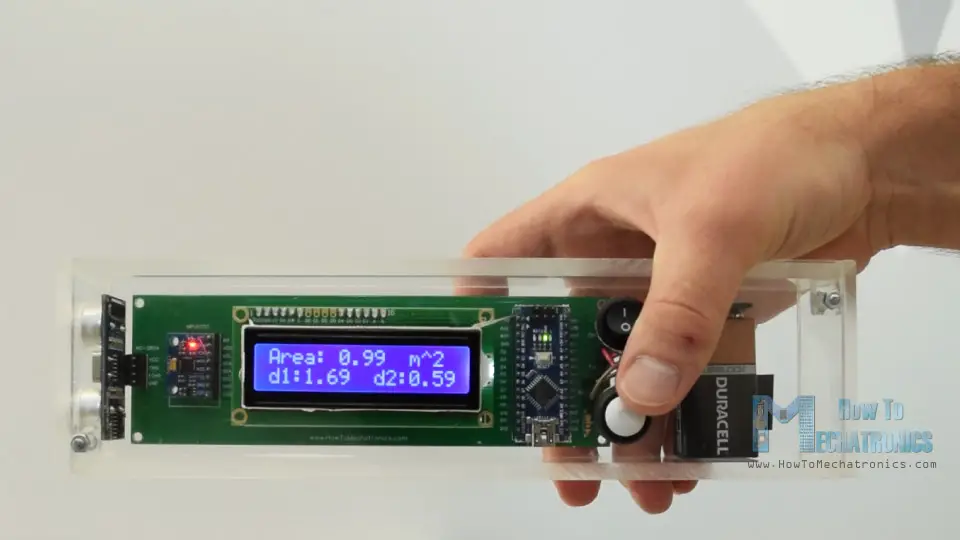
İkinci programa girmek için yine düğmeye basıp bir süre basılı tutmamız gerekiyor. Bu programda iki dik uzaklık ölçümü yaparak bir kare alanı ölçebiliriz.
 Bir sonraki program dijital su terazisidir ve burada zemine göre açıyı ölçebiliriz.
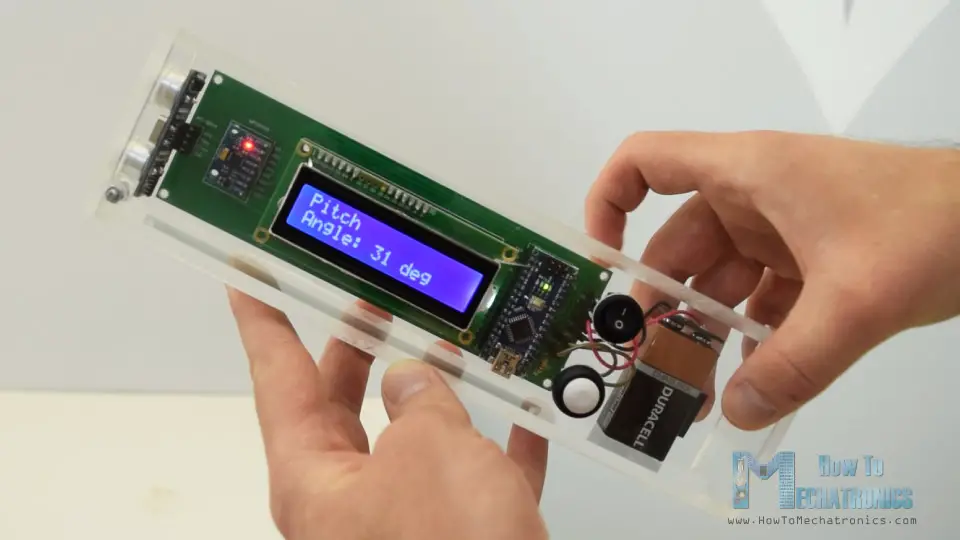
Düğmeyi kullanarak iki eksen arasında geçiş yapabiliriz veya Pitch veya Roll'u ölçebiliriz.
Arduino Mesafe Ölçer Devre Şeması
İşte bu Arduino projesinin devre şeması.
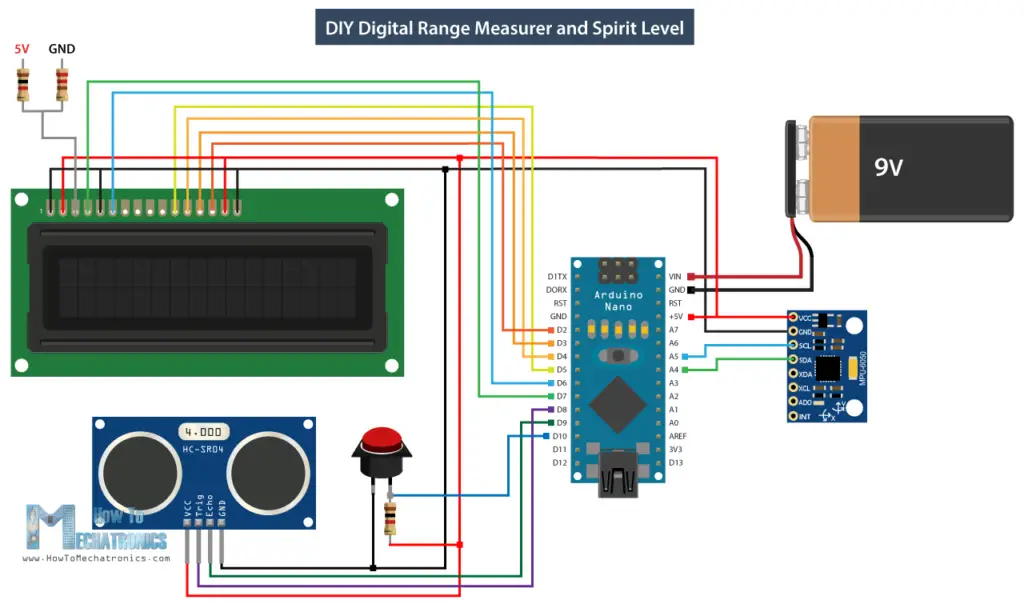
Arduino Aralık Ölçer ve Dijital Su Terazisi Kaynak Kodu
Kod biraz daha uzun olduğundan, daha iyi anlaşılması için, programın kaynak kodunu her bölümün açıklamasını içeren bölümlerde yayınlayacağım. Ve bu makalenin sonunda tam kaynak kodunu göndereceğim.
Bu nedenle, önce akselerometrenin I2C iletişimi için Wire.h kitaplığını ve LCD'yi kontrol etmek için LiquidCrystal.h kitaplığını eklememiz gerekir. Ardından LCD'yi, MPU6050 ivmeölçer modülünün I2C adresini , ultrasonik sensör pinlerini ve aşağıdaki program için gerekli bazı değişkenleri tanımlamamız gerekir.
#include<Wire.h> // I2C communication library
#include <LiquidCrystal.h> // includes the LiquidCrystal Library
LiquidCrystal lcd(7, 6, 5, 4, 3, 2); // Creates an LCD object. Parameters: (rs, enable, d4, d5, d6, d7)
const int MPU = 0x68; // I2C address of the MPU6050 accelerometer
Kurulum bölümünde, hem ivme ölçerin I2C arayüzünü hem de sıvı kristal ekranı başlatmamız ve ayrıca ultrasonik sensör tetikleyicisi ve yankı pimleri ve düğme pini için pin modlarını tanımlamamız gerekir.
// Initialize interface to the MPU6050
Wire.beginTransmission(MPU);
Wire.endTransmission(true);
lcd.begin(16, 2); // Initializes the interface to the LCD screen
pinMode(trigPin, OUTPUT);
pinMode(selectButton, INPUT_PULLUP);
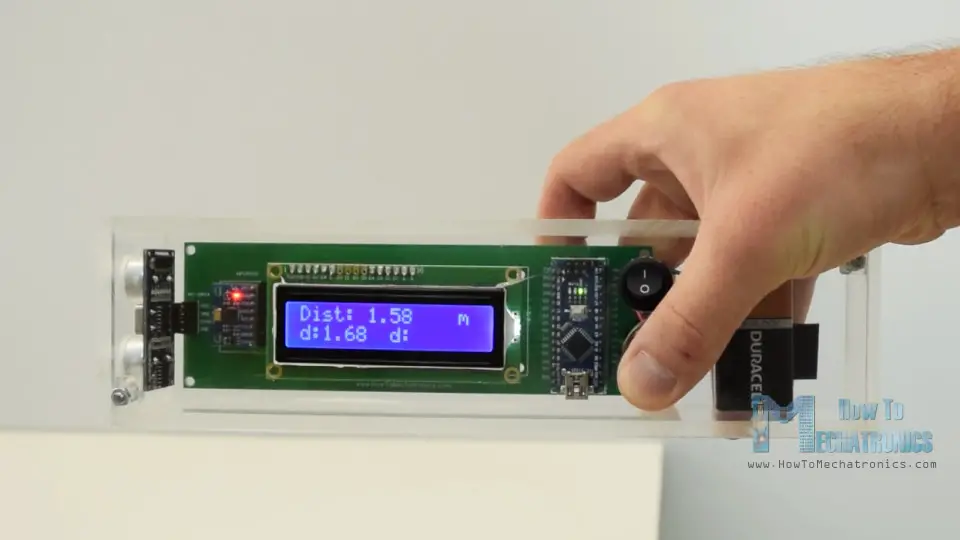
Ana döngü bölümünde, cihazımızın farklı programları arasında geçiş yapabileceğimiz bir anahtar deyimimiz var. İlk veya 0 numaralı durumda, ölçü birimini seçiyoruz. Lcd.print () işlevini kullanarak LCD'deki metni yazdırıyoruz ve if ifadelerini kullanarak dört ölçü birimi arasında geçiş yapıyoruz.
switch (program) { // Switch between different programs
case 0: // Select unit of measurement
lcd.setCursor(0, 0); // Sets the location at which subsequent text written to the LCD will be displayed
lcd.print("Select Unit: ");
// If button is pressed - change unit
if (digitalRead(selectButton) == 0) {
else if (unitSelect == 1) {
else if (unitSelect == 2) {
else if (unitSelect == 3) {
// If button is held longer then half a second - change program
if (digitalRead(selectButton) == 0) {
Burada unitSelect değişkeninin getDistance () cunstom işlevinde harekete geçtiğini not etmeliyiz, burada aslında ultrasonik sensörden aldığımız temel cm birimini hangi birime dönüştürmemiz gerektiğini söyler.
distance = distance; // cm to cm
else if (unitSelect == 2) {
distance = distance * 0.393701; // cm to in
else if (unitSelect == 3) {
distance = distance * 0.01; // cm to m
else if (unitSelect == 0) {
distance = distance * 0.0328; // cm to ft
Ölçü birimini seçmek ve ayrıca cihazın ilk programına girmek için basma düğmesini yarım saniyeden daha uzun süre basılı tutmamız yeterlidir.
// If button is held longer then half a second - change program
if (digitalRead(selectButton) == 0) {
1 numaralı durumda veya mesafe ölçme programında ilk önce getDistance () özel işlevini kullanarak en yakın nesneye olan mesafeyi elde ederiz.
case 1: // Distance measuring program
distance = getDistance(); // Distance to the nearest object
lcd.print(distance); // Prints the distance value from the sensor
if (digitalRead(selectButton) == 0) {
// If button is held longer then half sencond change program
if (digitalRead(selectButton) == 0) {
Bu fonksiyonun nasıl çalıştığını görelim.
//===== getDistance - Custom Function
digitalWrite(trigPin, LOW);
// Sets the trigPin on HIGH state for 10 micro seconds
digitalWrite(trigPin, HIGH);
digitalWrite(trigPin, LOW);
// Reads the echoPin, returns the sound wave travel time in microseconds
duration = pulseIn(echoPin, HIGH);
// Calculating the distance
distance = duration * 0.034 / 2; // distance in cm
distance = distance; // cm to cm
else if (unitSelect == 2) {
distance = distance * 0.393701; // cm to in
else if (unitSelect == 3) {
distance = distance * 0.01; // cm to m
else if (unitSelect == 0) {
distance = distance * 0.0328; // cm to ft
Burada tetik pimini kullanarak sensöre ultrasonik bir ses dalgası oluşturmasını söylüyoruz.
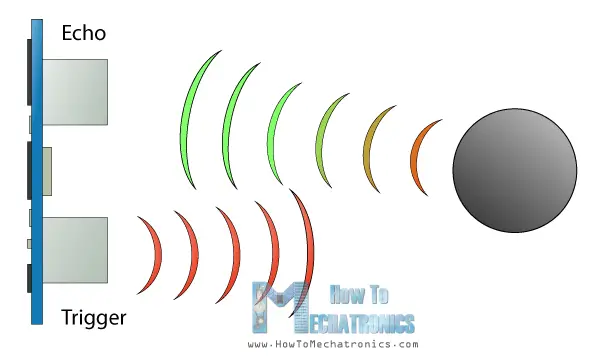
Daha sonra yankı pini ve pulseIn () işlevini kullanarak dalganın sensörden nesneye ve geriye doğru gittiği süreyi ölçüyoruz. Sesin hızı ve seyahat süresi göz önüne alındığında mesafeyi kolayca hesaplayabiliriz. Bu yüzden ölçülen mesafeyi bir miktar metinle birlikte LCD'ye yazdırıyoruz ve “if” ifadelerini kullanarak düğmeye basarsak son iki ölçümü yazdırır veya kaydederiz.
Sırada, benzer yöntemleri kullandığımız alanı hesaplama programı var. Oluşturdukları karenin alanını elde etmek için iki dikey ölçüm alıp bunları çarpmamız gerekiyor.
case 2: // Area measuring program
distance = getDistance();
lcd.print(area); // Prints the calculated area from the two measurements
lcd.print(unit); // Prints the selected unit and the square sign below
if (digitalRead(selectButton) == 0) {
area = d1 * d2; // Calculate the area
// If button is held longer then half sencond change program
if (digitalRead(selectButton) == 0) {
Son durum, açı ölçme programıdır. Burada, Dünya'nın yerçekimi alanının üç farklı eksende (X, Y ve Z) gücü olan ivmeölçer verilerini okumamız gerekir. Her eksenin değeri 2 yazmaçta saklanır, bu nedenle toplam 6 yazmaç okumamız gerekir. ve doğru değeri elde etmek için bunları birleştirin.
case 3: // Angle measuring program
// Read the accelerometer data
Wire.beginTransmission(MPU);
Wire.write(0x3B); // Start with register 0x3B (ACCEL_XOUT_H)
Wire.endTransmission(false);
Wire.requestFrom(MPU, 6, true); // Read 6 registers total, each axis value is stored in 2 registers
AcX = Wire.read() << 8 | Wire.read(); // X-axis value
AcY = Wire.read() << 8 | Wire.read(); // Y-axis value
AcZ = Wire.read() << 8 | Wire.read(); // Z-axis value
// Calculating the Pitch angle (rotation around Y-axis)
angle = atan(-1 * AcX / sqrt(pow(AcY, 2) + pow(AcZ, 2))) * 180 / PI;
// Calculating the Roll angle (rotation around X-axis)
angle = atan(-1 * AcY / sqrt(pow(AcX, 2) + pow(AcZ, 2))) * 180 / PI;
if (digitalRead(selectButton) == 0) {
// If button is held longer then half sencond change program
if (digitalRead(selectButton) == 0) {
İvmeölçerin X, Y ve Z değerlerini elde ettikten sonra, iki denklemi kullanarak Pitch açısını veya Y ekseni etrafındaki dönüşü ve ayrıca Roll açısını veya X ekseni etrafındaki dönüşü hesaplayabiliriz. Bundan sonra, değerleri LCD'de bir miktar metinle birlikte yazdırıyoruz ve düğmeye basarak LCD'de gösterdiklerimizi Pitch veya Roll açısı olsun, değiştiriyoruz.
İşte bu Arduino menzil ölçer ve su terazisi projesi için eksiksiz kaynak kodu:
DIY Digital Range Measurer and Spirit Level
www.HowToMechatronics.com
#include<Wire.h> // I2C communication library
#include <LiquidCrystal.h> // includes the LiquidCrystal Library
LiquidCrystal lcd(7, 6, 5, 4, 3, 2); // Creates an LCD object. Parameters: (rs, enable, d4, d5, d6, d7)
const int MPU = 0x68; // I2C address of the MPU6050 accelerometer
// Initialize interface to the MPU6050
Wire.beginTransmission(MPU);
Wire.endTransmission(true);
lcd.begin(16, 2); // Initializes the interface to the LCD screen
pinMode(trigPin, OUTPUT);
pinMode(selectButton, INPUT_PULLUP);
switch (program) { // Switch between different programs
case 0: // Select unit of measurement
lcd.setCursor(0, 0); // Sets the location at which subsequent text written to the LCD will be displayed
lcd.print("Select Unit: ");
// If button is pressed - change unit
if (digitalRead(selectButton) == 0) {
else if (unitSelect == 1) {
else if (unitSelect == 2) {
else if (unitSelect == 3) {
// If button is held longer then half a second - change program
if (digitalRead(selectButton) == 0) {
case 1: // Distance measuring program
distance = getDistance(); // Distance to the nearest object
lcd.print(distance); // Prints the distance value from the sensor
if (digitalRead(selectButton) == 0) {
// If button is held longer then half sencond change program
if (digitalRead(selectButton) == 0) {
case 2: // Area measuring program
distance = getDistance();
lcd.print(area); // Prints the calculated area from the two measurements
lcd.print(unit); // Prints the selected unit and the square sign below
if (digitalRead(selectButton) == 0) {
area = d1 * d2; // Calculate the area
// If button is held longer then half sencond change program
if (digitalRead(selectButton) == 0) {
case 3: // Angle measuring program
// Read the accelerometer data
Wire.beginTransmission(MPU);
Wire.write(0x3B); // Start with register 0x3B (ACCEL_XOUT_H)
Wire.endTransmission(false);
Wire.requestFrom(MPU, 6, true); // Read 6 registers total, each axis value is stored in 2 registers
AcX = Wire.read() << 8 | Wire.read(); // X-axis value
AcY = Wire.read() << 8 | Wire.read(); // Y-axis value
AcZ = Wire.read() << 8 | Wire.read(); // Z-axis value
// Calculating the Pitch angle (rotation around Y-axis)
angle = atan(-1 * AcX / sqrt(pow(AcY, 2) + pow(AcZ, 2))) * 180 / PI;
// Calculating the Roll angle (rotation around X-axis)
angle = atan(-1 * AcY / sqrt(pow(AcX, 2) + pow(AcZ, 2))) * 180 / PI;
if (digitalRead(selectButton) == 0) {
// If button is held longer then half sencond change program
if (digitalRead(selectButton) == 0) {
//===== getDistance - Custom Function
digitalWrite(trigPin, LOW);
// Sets the trigPin on HIGH state for 10 micro seconds
digitalWrite(trigPin, HIGH);
digitalWrite(trigPin, LOW);
// Reads the echoPin, returns the sound wave travel time in microseconds
duration = pulseIn(echoPin, HIGH);
// Calculating the distance
distance = duration * 0.034 / 2; // distance in cm
distance = distance; // cm to cm
else if (unitSelect == 2) {
distance = distance * 0.393701; // cm to in
else if (unitSelect == 3) {
distance = distance * 0.01; // cm to m
else if (unitSelect == 0) {
distance = distance * 0.0328; // cm to ft
ANA SAYFAYA DÖN
Bahadır ÖZGEN
Electronic Robotic Coding Research and Development 1975 - ∞
Learn Forever
If you want, let's learn together...
https://roboticcode2020.blogspot.com/
bahadirozgen1975@gmail.com
facebook robotic.code
instagram @roboticcode
Sayfalarımı ziyaret ettiğiniz için teşekkür ederim.Bu sitede mevcut olan içerikler kendi oluşturduğum projeler yazı,resim ve videolardan oluşmaktadır.İçerik oluşturmak çok uzun sürdüğü için bazı projelerde yurtdışı kaynaklardan faydalandım.Buradaki amacım ticari değildir.Kaynağı belli olan ve bizim kaynağına ulaşabildiğimiz materyal (yazı, fotoğraf, resim, video v.b.) için ilgili konularda fotoğraflarda logo varsa v.b. not olarak gösterilecektir.Sitemizde yayınlanan tüm içerik, bizim tarafımızdan ve internet üzerinden youtube, facebook ve blog gibi paylaşıma sunulmuş kaynak sitelerden alındığı için, sitemiz yasal yükümlülüğe tabi tutulamaz. Sitemizde telif haklarının size ait olduğu bir içerik varsa ve bunu kaldırmamızı isterseniz, iletişim sayfamızdan bizimle iletişime geçtiğiniz takdirde içerik yayından kaldırılacaktır.Bu konu ve modüller ile uğraşarak, ileride çok güzel makine ve elektronik aletler yapabilirsiniz.

 Bir sonraki program dijital su terazisidir ve burada zemine göre açıyı ölçebiliriz.

